The answer is simply NO! So, you need to add the English language besides the existing one. Then you will be able to switch between these languages to use one and probably the English language.
Steps to Install and Activate English Language
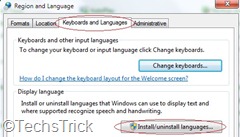
1. At first, go to Control Panel and click on the Regional and Language (in small icon view).2. Now select the Keyboards and Languages tab and press on Install/Uninstall Languages under the Display Language.
3. Choose Install display language and then Lunch Windows update.
- Must Read:
Fix Errors Uninstalling Optional Updates.
4. From the Optional Updates find out the English Language Pack and mark it to be installed. Complete the download and it would take a while to complete the installation.
5. Log off or reboot your system to activate the language properly.
Nice! You've activated the English language to your PC.
Note: Don't forget to log off/reboot after installing the new language, otherwise it won't work properly. You need a working internet connection.
If it helps you and you are able to see the English language, then share to other to help them. If it doesn’t help, then leave a comment.


.jpg)


No comments:
Post a Comment