Splitting a hard disk drive into two or more partitions refers to
slice/divide/partition a particular drive into multiple logical drives. Usually manufacturer of a laptop or desktop computer gives one partition and it's the
system drive C: where you have to keep your all documents, pictures, music and other files. It often creates problems to manage all types of data in a same partition. Moreover, there is a risk to keep the important files in a partition which is the system drive.
Because when the operating system like
Windows fails to boot or start up and it is unable to
fix itself from it's repair mode then recovery or external boot most of the times unable to recover your personal files from the drive.
So dividing the drive is an important topic if you want to keep the different types of files in other than the system drive and get them back even after re-installing Windows OS. Adding that, you may need a separate drive for backup/recovery or want to install another operating system(known as dual boot) to another drive.
The easiest way to partition a drive:
Windows 8/7/Vista Users don't need to download extra tools or waste money doing this task as they already have a Disk Management built-in.
1. First step is to go to
Manage by right-clicking on
Computer. Or open the
Control Panel and navigate to the
System and Security,
Administrative Tools,
Computer Management (it's in the category view of Control Panel).
 |
| Manage from Computer |
2. From the left Pane click on
Disk Management under the
Storage and your disks will be loaded within a moment.
 |
| Disk Management |
3. Now select the drive you want to split and select the
Shrink the volume. The selected drive should have some free space and that free space will be the new volume.
4. In the new Shrink window size of the new volume is already given.
Be careful! It just displays the free space. You should/must decrease the given size so that the existing drive can get some free space. Set the amount of space in megabytes.
 |
| Shrink a Volume/Drive |
5. Shrink it. It could take a while.
 |
| Shrink done & Unlocated volume created |
It's not done yet! A new Unllocated Space will be shown which has no drive letter and Windows will unable to display or work with it. It needs to be assigned as a Logical Drive. So, right-click on the Unllocated Drive and select New Simple Volume.
6. The New Simple Volume Wizard will drive to make the drive Logical. Click on
Next and then the amount of the volume will be set automatically. You can wish to decrease the size if you want to create another volume.
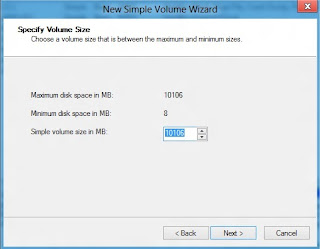 |
| Set drive size |
7. Here, assign the drive letter and continue
Next.
 |
| Assign drive letter |
8. Now Format the Partition in NTFS file system and mark the
Quick format. You can also set a name to the drive in
Volume label.
 |
| Set File system, label & mark quick format |
9.
Completing the new Simple Volume Wizard shows the settings that are made for this new partition. Here click on the Finish and within a minute the new drive will be created.
 |
| New drive created |
You are done! Now you can use the separate drive for storing and installing files and software even for a dual boot.
You may interested in:


.jpg)


No comments:
Post a Comment